Country rugs. Do-it-yourself rugs for home and garden: different types, materials, technologies. Illuminated rug
There are too many things accumulated in your closet that you can’t wear, and it’s a pity to throw them away? No problem! You can use them to make an excellent designer rug for your home using the ideas and technologies described in our article.

What is needed to make a rug? Yes, anything! Open the closet and examine things with a critical eye. The list of materials that can be used is very large:
- old knitted items - T-shirts, sweatshirts, jumpers;
- thick fabric from jeans, coats, jackets;
- remnants of knitting threads, rope or cord.

Advice! Materials can be combined, giving free rein to your imagination, as a result the house will be decorated with an original and unique carpet that keeps the warmth of your hands.


When choosing a technology, take into account the characteristics of carpets made of different materials. Patchwork and fleecy ones are suitable for the bedroom, they are pleasant to walk on barefoot, but they do not last long. Knitted and woven carpets are stronger, but tougher; they are best laid in the hallway and kitchen. Bathroom rugs should absorb water well, dry quickly and not fade.

Rugs for the front door need to be washed and cleaned frequently; it is better to use waterproof materials for them.

Also consider the style of the new item and its compatibility with your interior. Motley multi-colored carpets will fit perfectly into the design of a children's room, wicker and woven rugs will decorate a kitchen or country house.

A strict openwork carpet or a product with a classic ornament will take pride of place in the living room, giving it charm and comfort.

Types and methods of manufacturing
A colorful homespun rug or a patchwork rug – what should a novice craftswoman choose? The techniques for making carpets for the home are very diverse. If you exclude completely unique ideas, they can be combined into several groups.
Sewn– a decorative covering sewn to a dense base, or individual elements sewn together. This group includes shaggy bathroom rugs and “grandmother’s” rugs made from braided braids, as well as pom-pom rugs for children.


Knitted– rugs of rectangular, round or oval shape, crocheted or knitted. To give them volume, not only threads are used as material, but also strips of any non-flowing fabric.


Nodular– many pieces of soft fabric, rope or thread are tied onto a mesh base with a knot, imitating a long pile of grass. The base is polypropylene mesh from a hardware store.


Woven– for them, the traditional weaving technique with longitudinal and transverse threads and a simple homemade weaving “mill” are used. The basis of such rugs can be scraps of any fabric and thread. Durable weaving will prevent the fabric from fraying.

Wicker– they are mainly made from durable cord. These rugs resemble a mat, they are extremely strong and durable, but they are not very pleasant on the feet, so they are usually used in the hallway.

Glued– carpets made from original materials, glued to the base with a suitable adhesive. Any elements are suitable for their manufacture: leather, thick fabric, corks, pebbles. The main condition is that it should be pleasant to walk on them.

The tools needed to make a rug with your own hands are in the arsenal of any needlewoman: knitting needles and a hook, needles of different thicknesses, a sewing machine, as well as skillful hands and imagination.
Advice! Don’t be afraid to try new techniques that are unknown to you – mats can be a great way to practice and hone your skills.
Shaggy knotted rug
The basis for such a rug is a construction polypropylene mesh or a mesh for needlework. The pile can be made from any soft, non-flowing material - knitwear, fleece, terry cloth or thick knitting threads. Craftswomen often use old T-shirts to make it - this rug is soft and does not require extra costs.

Table 1. Knotted rug made from old T-shirts - master class.
| Steps, photo | Description of actions |
|---|---|
| Prepare strips of knitted fabric: open the sleeves and neck of the T-shirts, open the seams. Cut them using sharp tailor's scissors into strips 3-4 cm wide. The length of the strips depends on how long the pile you want to get, 10-25 cm is enough, taking into account tying a knot and further leveling. |
| Spin the resulting knitted strips in the washing machine without detergents on the shortest setting, for example, “rinse”. This is enough for them to curl into tubes. If you are using knitwear in several bright colors, make sure it does not fade, or wash different colored pieces separately. |
| The resulting blanks will be almost dry after spinning; they need to be dried completely in a dryer or scattered on a large terry towel - it will quickly absorb the remaining moisture. |
| While the knitted pieces are drying, prepare the mesh. Cut it to the size of the rug, give the base the desired shape. If the edges of the mesh are unraveling, tape them on both sides with adhesive tape. |
| To thread the pieces through the mesh you will need a crochet hook. It is brought from above into one of the grid cells and taken out into the adjacent cell. Grab a loop from a knitted tube folded in half and pull it into the first cell. The ends of the workpiece are threaded into the resulting knitted loop and the knot is slightly tightened. It’s more convenient to do this using the same crochet hook. The ends are straightened, their length is equalized if necessary, and only after that the knot is tightened tightly. When making a plain rug, it is more convenient to start from one edge and, moving in rows, fill the grid. If you want to make a rug with a pattern, it is better to create a template in advance and color the grid with multi-colored markers - this will make it easier for you to fill the pattern with scraps of the desired color. |
| The rows are filled in a checkerboard pattern - this will ensure uniform thickness and density of the pile. Check the underside of the rug from time to time and straighten out any knots if necessary. |
| The pile of the finished rug can be trimmed with scissors, and the edges can be trimmed with fabric to give it a finished look. To extend the life of the rug, you can sew thick fabric to the bottom. |


A similar rug can be made without a mesh; instead, you will need a dense base fabric. Knitted fabrics are made using the above method.
The base fabric is cut to fit the size of the rug. Glue a strip of narrow double-sided tape, and attach knitted tubes to it with the middle part, close to each other. They are sewn on a machine directly over the tape.

The first row of scraps is folded back, a second strip of tape and knitted blanks are glued at some distance, and stitched. Continue this way to the opposite edge of the base.
Advice! Rugs made from knitted patches can have any shape: heart-shaped, star-shaped, fluffy cloud. This will not complicate their production - it is enough to prepare the base of the desired shape.


Rug made of fabric braids
It differs from patchwork rugs in its dense woven structure and original variegated colors, which are achieved by interweaving knitted stripes of different colors.

For such a rug you will need knitted ribbons of different colors. The thickness of the finished product depends on their width; for a dense thick rug it is better to take ribbons about 5 cm wide. How to get a long ribbon without knots from a T-shirt is shown in the video.
Video - How to make a knotless ribbon from a T-shirt
Table 2. Carpet made of knitted braids - master class.
| Steps, photo | Description of actions |
|---|---|
| Cut old T-shirts of different colors into strips 4-5 cm wide as described in the video, this will avoid unnecessary knots. To make the strips curl into ropes, you can moisten them and dry them. |
| Fasten three strips of different colors at the ends using a strong thread. Start braiding them into a regular braid, not pulling them too tightly. Gradually roll the braid into a spiral. |
| After laying the next turn, it is necessary to secure it from the inside out using a needle and strong thread - no less than No. 20. |
| Gradually adding ribbons of a different shade, you can achieve the desired color scheme. It is convenient to connect the ends of the ribbons without knots using a needle and thread. The coils can be temporarily secured with office clips. |
| After laying the last turn, the end of the braid is carefully brought inside out and secured with threads. |


To make the carpet stronger, you can use a sewing machine. In this case, a long braid is first woven, and the winding is carried out directly under the machine’s foot. They wind the end of the braid, lower the needle to its beginning and, turning the product, lay the next turn. Sew with a zigzag at the junction of the turns.

Rug made of braids - manufacturing stages
A rug stitched by machine is more durable and rigid, lasts longer and looks neater, and this method also saves time.
Advice! When making a rug, it is better to use sewing machine needles marked H-S or H-SUK - these are needles for knitwear; they easily move apart knitted loops and do not tear the fabric.
Video - Rug made from old socks
Knitted rugs and rugs
Knitted rugs, which were very popular in the times of our grandmothers, are coming back into fashion. And this is not surprising - the knitting technique allows you to create uniquely beautiful things that fit into any interior.

Simple Crocheted Round Rug
The simplest option, which even a novice craftswoman can handle, is a two-color round rug knitted with double crochets. It will require knitted or thick wool yarn and a No. 10 hook.
Row 1. For the first row, you need to knit a chain of 6 chain stitches and close it into a ring. Threading a loop into the resulting ring, knit 2 chain stitches to lift the row and 11 double crochet stitches.

Row 2. The second row is knitted with a thread of a different color: 2 chain stitches and 2 double crochet stitches in each loop of the first row.
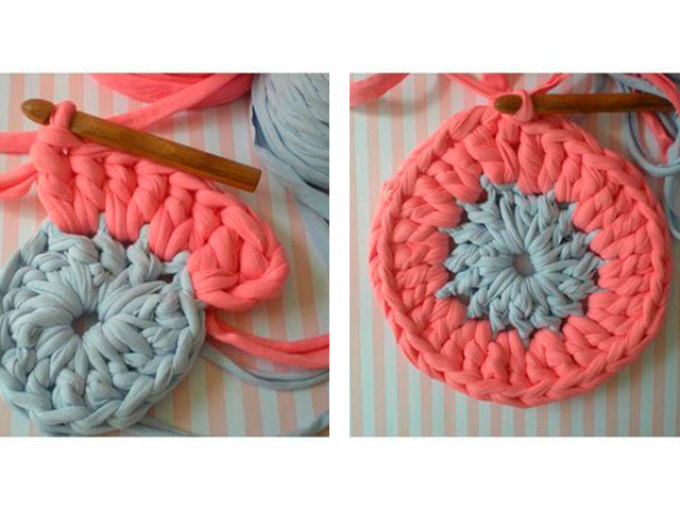
Row 3. Change the thread again. Knit two chain stitches, then alternate a double crochet and two double crochets in one loop according to the pattern.

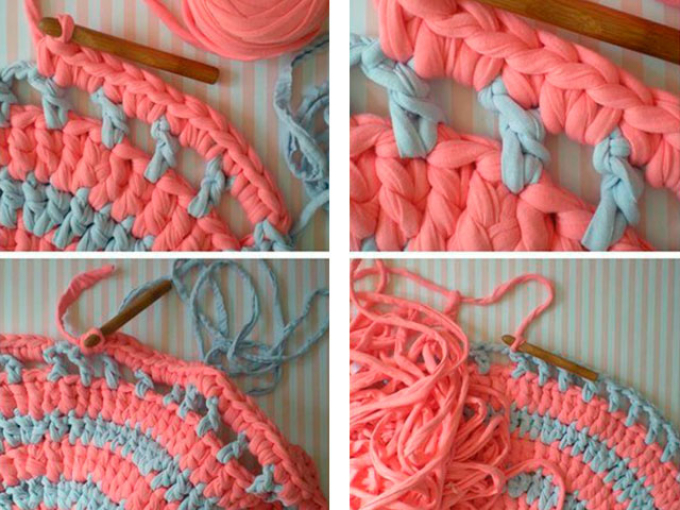
Row 4 and further until desired rug size. Knit 2 chain stitches, then double crochet stitches in each loop and two double crochet stitches in one loop at the end of each sector. The color of the threads is alternated to create an ornament.

The last row is tied with a contrasting thread in single crochets and the last loop is tightened tightly. Cut the thread at a distance of 5 cm and hide the tail using a hook on the wrong side of the knitting.
Rugs can be knitted either crocheted or knitted. Mostly the simplest techniques and loops are used, but experienced craftswomen also surprise with complex openwork products. Patterns of knitted rugs are given below.


Video - Oval mat made from plastic bags
Homespun rugs and rugs
Classic homespun carpets and rugs have excellent thermal insulation and create a special atmosphere of comfort. In addition, to make them you can use scraps of any fabric - knitwear, calico, calico. The more varied the colors, the more fun the rug will be.

Woven rugs and rugs are made rectangular, their width is limited by the width of the weaving mill. How to make a simple woven rug is described below.
Table 3. Do-it-yourself woven rug from fabric scraps - master class.
| Steps, photo | Description of actions |
|---|---|
| To make a rug you will need a wooden frame that is the size of the product. It can be made from a board or block with a cross-section of 20x40 mm, connected with corners and self-tapping screws on the reverse side. Small nails are attached to the top and bottom bars of the frame - the warp threads are secured to them. Carnations can be replaced with push pins. Two removable wire rods are attached to the sides of the frame - weft threads will be attached to them; they are needed for the rug to keep its shape. The frame can be placed on a stand or placed on a table. |
| Strong threads or strips of neutral-colored fabric are used as warp threads. They are hooked to the nails on the top and bottom bars with a snake. Attach to a knot at the starting and ending points. |
| For weft, the fabric is cut into strips 1.5-2 cm wide. You can immediately tie individual strips into a common thread and wind them into small balls. The weft thread is attached to the corner nail and weaving begins. Thread the weft through the warp threads with a snake, either from above or from below the warp, alternating the position of the weft in each subsequent row. The edges are traced through the knitting needles on the side strips to ensure even edges. |
| It is convenient to weave from both sides from the edges to the middle. In this case, it is necessary to maintain the pattern and the same tension of the threads so that the rug turns out even. The wefts are pressed tightly against the previous row. |
| By gradually changing the color of the fabric stripes, you can create ornaments and smooth transitions. The optimal solution is to use fabric of different colors, but of the same structure. |
| At the final stage of weaving in the middle of the rug, it will be difficult to thread the balls between the warp threads; it is easier to use separate strips of fabric and a crochet hook. |
| The ends of the fabric strips are carefully tucked into the already woven rows by 10-15 cm, this will allow them to be well secured. After this, the free ends are cut off. Remove the base from the nails, take out the removable knitting needles and remove the rug from the frame. |


Video - Master class. Homespun rugs
Children's play mats made of pompoms
Bright soft rugs that even the little ones can sit and lie on are a great idea for a child’s room! To make such a carpet you will need multi-colored pompoms made of thread or fabric.
A pompom rug can be made from threads literally in one evening. For it you will need multi-colored knitting threads and base fabric. To make pompoms, a skein of thread is stretched between two supports and firmly tied at a distance of 5 cm with a thread of the same color, leaving the ends 10 cm long. Cut it between the constrictions and scissors to give the pompoms a round shape.

The ends of the tightening threads are pulled through the warp fabric or mesh and tied firmly with a knot. Place the pompoms quite tightly so that there are no tears in the mat.

An educational mat made of soft knitted pompoms is a more complex product, but it is simply irreplaceable for a child’s room, because even babies can be placed on it.
Table 4. Pompom rug - master class.
| Steps, photo | Description of actions |
|---|---|
| 1. Hot glue gun 2. Tailor's scissors 3. Strong thread and large eye needle 4. Cardboard template 5. Old T-shirts or knitted fabric in different colors 6. Thick fabric or non-woven fabric 7. Furniture foam rubber 8. Sintepon 9. Oilcloth for mattress 10. Bright fabric for a mattress cover 11. Zipper for mattress cover |
| A round template with a diameter of 12-15 cm is cut out of cardboard. Blanks for pompoms are traced using it and cut out from multi-colored knitwear. Their number and colors depend on your imagination. |
| Using a “forward needle” stitch, sew a circle along the edge with an indentation of 0.5 cm, and tighten the edges slightly. Scraps of furniture foam rubber are wrapped in synthetic padding so that there are no protrusions. |
| Pompoms are formed from fabric and filling, the edges are finally pulled together and sewn up. |
| Prepare pompoms of different colors in the required quantity. They are laid out in bags so that later it is convenient to create a drawing. |
| The base of the rug is cut out of thick fabric in the form of a circle with a diameter of 1.5-1.6 m. The pompons are glued to the base using a hot glue gun, following the chosen pattern, in this case a rainbow. |
| Having completely secured the design, you can begin making the mattress. It is made from furniture foam rubber with a thickness of 50-100 mm. Cut out a circle with a diameter of 1 m, cover it with oilcloth, securing it with hot-melt adhesive. |
| They sew a mattress cover from soft, bright fabric: two circles with a diameter of 1.1 m are sewn from the wrong side to 2/3 of the circle, turned inside out and a zipper is sewn in. Place the cover on the mattress and place it on the mat. For fastening, you can provide Velcro on its underside. |


Braided rope rug
A very practical and durable rug can be made from thick rope - nylon, jute or cotton. For a rug measuring 0.85 x 0.6 m you will need about 60 m of rope with a thickness of 1.2 mm.

For convenience, it is better to weave on a flat surface on which the dimensions of the rug are indicated - this makes it easier to maintain its proportions. The ends of the nylon rope must first be burned to prevent it from unraveling. The ends of jute or cotton rope can be secured by wrapping them with strong thread.
The weaving pattern is shown in the figure. First, weave the first row of the pattern, then repeat it several more times until the mat is completely filled.

Prices for bath mats
bath mat
Video - DIY jute rug
A homemade rug is not just a new life for old things. Small details made by yourself give the home a unique flavor, create a positive attitude and an atmosphere of comfort.
What is "Hand Made"? This is a banal, ordinary handicraft, English transcription, new, fashionable, modern sound. After the term came into use, interest in this activity increased.
Handmade hobby - is it boring or fun?
Previously, in Rus', only girls from noble families could afford to embroider a handkerchief in their spare time. They did it for fun and in order to show their best side, to demonstrate their meekness of character.

The peasants did not particularly use handkerchiefs; they saved fabric. It was necessary to use a spindle to create cloth, sew clothes, curtains, bed linen, tablecloths, embroider all this for yourself, your family, home, comfort. Also prepare fabric and threads for the gentlemen’s young ladies.

Nowadays, each person diversifies his leisure time at his own discretion. Buying fabric is not a problem. Scraps, ribbons, woolen, linen threads, beads, beads, rhinestones, lace help to put the most daring ideas into practice.

It is fashionable to make your own clothes, accessories, and a variety of decorations for the interior of the room. Notebooks, carpets, dolls, paintings can be made if desired. handmade is a fascinating hobby that everyone can afford. Handicraft is still considered something boring and tedious.

Why handmade carpets?
Christian Dior once seriously wanted to start making carpets. This art captivated him, but in the end he chose clothes. It happened that way. Despite the fact that the meter abandoned this idea, to this day designers treat handmade carpets with particular respect.

On a sunny morning, throwing the blanket aside and walking barefoot on a soft, luxurious carpet that gives bliss is certainly pleasant.


The interior and comfort in the house are a source of self-sufficiency. It happens that the area of the apartment is small. How to buy an apartment? It's a difficult question. Not everyone and not at any age can afford to buy a spacious apartment. In this regard, melancholy can creep into the soul and settle in the heart.

The flow of self-love in the river of self-sufficiency will be blocked either by a bump or a stone of unwanted circumstances. This can only be changed if you create a good interior design. In this case, when you come home, you can rest and relax. The nervous system will be restored, the mood will improve, irritability, anger, and quarrels will disappear.

A compromise will be found at the right time, discussion, dialogue will help improve relationships with colleagues. Perhaps loneliness will disappear, a friend, a loved one will suddenly appear.

A DIY carpet is a great start, the first step on the path to success. The room will be different. It can be made either from specially purchased materials or from unnecessary scraps.

Suitable manufacturing technique
By looking at photos of a do-it-yourself rug and examples, you can get a lot of ideas. Rugs can be very different. There are not so many techniques for creating them.

Having chosen the best, optimally suitable one, concentrated on creativity, tuned in to success and luck, you should get to work. There are no unnecessary doubts. You can even make a rug in one day.

Carpets are:
- woven;
- sewn;
- wicker - from rope or from shreds;
- crocheted or knitted - with or without a fabric base;
- made from softwoods, pebbles and other materials that evoke sympathy.


A woven rug is created using special tools. This method is many centuries old. If spending on tools is not included in your plans, you should use everything that is at hand. This is the basic principle of handmade.

Sewn rugs involve the use of any fabric. If you have a lot of T-shirts and jeans lying around the house, you can cut them up, turn them into appliqués, sew them onto a base, or use padding polyester.

It’s easy to turn the same T-shirts, sweaters, paitas, blouses into filler, crushing them to the size of confetti, a little larger than dust - the threads of the main fabric should hold them.

You will have to divide the base into cubes and triangles so that the filler does not roll off and is distributed harmoniously. After all this is done, you need to sew on a canvas with a pattern.

Cubes and diamonds sometimes get in the way and deform the drawing. It is more rational not to turn the carpet into a blanket, but to use several layers of fabric or thin, smooth, even padding polyester.

From appliqués and scraps alone, you can create a fluffy, openwork rug if desired. It will be less durable. Perhaps it will be characterized by asymmetry. But is that bad? The main thing is that this rug matches the interior design and its style.

Braided ones from scraps or rope are more difficult to create. You need to know how to tie knots. An example diagram will be useful. Once you get the hang of it and figure it out through trial and error, it will be easy to draw your own diagram. But it’s unlikely that you’ll be able to draw it right away.

The easiest way to master the art of weaving carpets from scraps and rope is through practice. The scheme can be scary. Sometimes they look at her for a long time, not daring to start. You need audacity, optimism comes in handy. For some people, this particular technique is immediately easy for them and becomes their favorite. Handmade helps to reveal talents and teaches you to be surprised at yourself.


How to make a rug with your own hands if you have yarn, a hook or knitting needles? It couldn't be simpler. But the process of creating it will take quite a lot of time.

The patterns will help you master this skill and learn how to knit the desired shape. Pom poms will come in handy. They can be used to make a carpet faster.

Unusual materials are often chosen for a handmade carpet. Everything that is at hand is used - at your own discretion, to your taste. The main thing is that in the end the carpet is not slippery.

A room or apartment should be made to feel comfortable. This is true self-care. It is important to rest after a busy day, get enough sleep, warm up in the winter cold, and devote a little time every day to yourself.

This can be done if there is a personal space created with the help of a screen or with the help of color, craftsmanship, talent, hand-made products.

DIY rug photo


Rugs have been used in everyday life for quite a long time. This is probably one of the most ancient woven products. At first, plants were used as weft thread: bast, grass or reeds. Since the 19th century, quite a lot of cheap factory fabrics have appeared, which made it possible to buy more new fabrics and make rugs from recycled woven fabric. The cheapness and availability of the material and ease of manufacture allowed woven rugs to become an integral part of Russian life. The same technique was used not only for making rugs, but also for bedspreads, capes, and lint-free carpets. Each craftswoman tried to make her work unique, which gave rise to many techniques for creating homespun rugs.
The materials for weaving rugs are colored threads and fabric. The fabric is cut or torn in long strips, 1.5-2 cm wide along the base. If necessary, the tapes are stitched or twisted.
A little theory of rug weaving.
Warp threads are the threads that are threaded into the loom or stretched onto the cardboard.
The weft threads are the threads we will use to weave.
The shed is the distance between the warp threads raised through one. A weft thread is inserted into the shed.
There are three main weaving techniques for rugs:
 Weft rep weaving technique - the warp threads are not visible, and the pattern is created by weft threads. You can weave with several wefts, thereby creating different patterns. The distance between the warp threads is quite wide, and the weft threads fit tightly to each other.
 “Plain weave” technique. In this option, both the warp and weft threads are equally visible.
 Technique "Refueling reps". The weft threads are not visible, and the pattern is created by the warp threads. To create rugs using this technique, you need to use weft threads to pull the warp threads together.
Technique for weaving rugs “Stripe”

The technique gets its name from the colored longitudinal stripes formed by the warp threads, while the weft threads are not visible. The technique used here is “Refueling Rep”.
Weaving technique for rugs “Ribbon, valance”.

The pattern using the “Ribbon, Valance” technique is formed by alternating stripes of different widths. The wide part is called a ribbon, the narrow part is called a valance. The “Plain weave” technique was used. Warp threads are much thinner than weft threads. "Ribbons" are often made from fabrics or threads of different colors. And in order to somehow balance out the “valances,” the same ones are often made throughout the rug.

One or more valance threads on rugs may be twisted. We simply make a twisted cord from two strands and use them as weft.

The valance is twisted. We twist the weft fabric strip through several warp threads along the entire length of the fabric as in the photo.
Weaving technique for Lyapiki rugs.


The warp threads are thin, the weft threads are thick fabric. Between the warp threads, previously cut pieces of plain fabric 2-3 cm long, “lapiks,” are placed in the shed at the same time as the weft is laid. You can place lapiks often, or rarely. They create additional volume on the rugs. You can also use lapiks to make complex designs.
Technique for weaving rugs “Zakladok” or “mortgage weaving”.


Using this technique you can create geometric patterns. The pattern is made with bookmarks—uniform pieces of fabric of the same size. Pieces of fabric are wrapped around the weft thread and placed in the desired places on the woven rug as the work progresses. The created pattern is double-sided, identical on the front and back sides.
Weaving technique for rugs “Lint-free carpet”.


We weave using the “Duck Rep” technique. The warp threads are not visible. We thread the loom with sparse warp threads. We tape the weft thread tightly to the previous row. You can use multiple weft threads.
Weaving technique for rugs “Gingerbread”, “Need”.

One of the simple, but at the same time very effective techniques for weaving rugs.
We stretch the base from contrasting threads - these are our vertical stripes. We work with two wefts: one with fabric tape, the second with thread.
We put a fabric weft into the first shed, change the shed and insert a thread weft. We continue to work, alternating thread and fabric weft, until we reach the end of the cage. Here we once again lay the same weft that was last in the cage. That is, we lay either fabric or thread weft twice. And continuing to work again, laying ducks through one.
Weaving technique for rugs "Twitching".

Rugs made using the “Twitching” technique resemble terry towels. Their pattern is made up of air loops. The warp threads are cotton, two wefts, one with fabric ribbons 2 cm wide and the second weft with wool thread.
We put wefts with fabric tape into the first shed, and wefts with woolen thread into the second shed. The process of alternating fabric and wool wefts is repeated until the end of the work.


In accordance with the pattern, we collect air loops through each warp thread onto a needle. The height of the loops will depend on the thickness of the needle.